ดาวน์โหลดงานนำเสนอ
งานนำเสนอกำลังจะดาวน์โหลด โปรดรอ

1
RefWorks โดย... ประภาศรี ฟุ้งศรีวิโรจน์ prapasri@book.co.th แผนกฝึกอบรมฐานข้อมูล บ. บุ๊คโปรโมชั่น แอนด์ เซอร์วิส จำกัด ปรับปรุงล่าสุด 03/12/50

2
RefWorks คืออะไรและมีประโยชน์อย่างไร โปรแกรมจัดการทางบรรณานุกรมซึ่งทำงานบนเว็บ (Web) • จัดการและจัดเก็บรายการทางบรรณานุกรมได้อย่างเป็นระบบ • สร้างคลังข้อมูลอ้างอิงส่วนบุคคล (your personal library) • เข้าใช้ได้ทุกสถานที่ ทุกเวลา บนเครือข่ายอินเทอร์เน็ต • มีรูปแบบบรรณานุกรมที่หลากหลายต่อการใช้งาน • สืบค้นและถ่ายโอนข้อมูลอ้างอิงจากฐานข้อมูลออนไลน์กว่า 100 แหล่งข้อมูล • “Write-N-Cite” มีหน้าที่สำคัญในการช่วยนำข้อมูลที่จัดเก็บมาใช้อ้างอิง ในผลงานวรรณกรรมได้อย่างรวดเร็วตามรูปแบบการอ้างอิงที่ต้องการและ ถูกต้อง โปรแกรมจัดการทางบรรณานุกรมซึ่งทำงานบนเว็บ (Web) • จัดการและจัดเก็บรายการทางบรรณานุกรมได้อย่างเป็นระบบ • สร้างคลังข้อมูลอ้างอิงส่วนบุคคล (your personal library) • เข้าใช้ได้ทุกสถานที่ ทุกเวลา บนเครือข่ายอินเทอร์เน็ต • มีรูปแบบบรรณานุกรมที่หลากหลายต่อการใช้งาน • สืบค้นและถ่ายโอนข้อมูลอ้างอิงจากฐานข้อมูลออนไลน์กว่า 100 แหล่งข้อมูล • “Write-N-Cite” มีหน้าที่สำคัญในการช่วยนำข้อมูลที่จัดเก็บมาใช้อ้างอิง ในผลงานวรรณกรรมได้อย่างรวดเร็วตามรูปแบบการอ้างอิงที่ต้องการและ ถูกต้อง
 • จัดการและจัดเก็บรายการทางบรรณานุกรมได้อย่างเป็นระบบ • สร้างคลังข้อมูลอ้างอิงส่วนบุคคล (your personal library) • เข้าใช้ได้ทุกสถานที่ ทุกเวลา บนเครือข่ายอินเทอร์เน็ต • มีรูปแบบบรรณานุกรมที่หลากหลายต่อการใช้งาน • สืบค้นและถ่ายโอนข้อมูลอ้างอิงจากฐานข้อมูลออนไลน์กว่า 100 แหล่งข้อมูล • Write-N-Cite มีหน้าที่สำคัญในการช่วยนำข้อมูลที่จัดเก็บมาใช้อ้างอิง ในผลงานวรรณกรรมได้อย่างรวดเร็วตามรูปแบบการอ้างอิงที่ต้องการและ ถูกต้อง โปรแกรมจัดการทางบรรณานุกรมซึ่งทำงานบนเว็บ (Web) • จัดการและจัดเก็บรายการทางบรรณานุกรมได้อย่างเป็นระบบ • สร้างคลังข้อมูลอ้างอิงส่วนบุคคล (your personal library) • เข้าใช้ได้ทุกสถานที่ ทุกเวลา บนเครือข่ายอินเทอร์เน็ต • มีรูปแบบบรรณานุกรมที่หลากหลายต่อการใช้งาน • สืบค้นและถ่ายโอนข้อมูลอ้างอิงจากฐานข้อมูลออนไลน์กว่า 100 แหล่งข้อมูล • Write-N-Cite มีหน้าที่สำคัญในการช่วยนำข้อมูลที่จัดเก็บมาใช้อ้างอิง ในผลงานวรรณกรรมได้อย่างรวดเร็วตามรูปแบบการอ้างอิงที่ต้องการและ ถูกต้อง")
3
ขั้นตอนการใช้งาน 1. สร้างบัญชีชื่อการใช้งาน RefWorks 2. สร้างคลังข้อมูลอ้างอิงส่วนตัว (My Library) 3. การเพิ่มรายการอ้างอิง 3.1 การเพิ่มรายการอ้างอิงด้วยตนเอง (Adding References Manually) 3.2 การถ่ายโอนรายการอ้างอิงจากฐานข้อมูลการสืบค้นเข้าสู่ RefWorks 3.2.1 Importing data directly from online database 3.2.2 Importing data from saved text files 3.2.3 Importing records from other bibliographic management programs 3.2.4 Online Catalog or Database 4. นำรายการอ้างอิงที่จัดเก็บมาใช้งานร่วมกับโปรแกรมจัดการเอกสาร (Write-N-Cite) 1. สร้างบัญชีชื่อการใช้งาน RefWorks 2. สร้างคลังข้อมูลอ้างอิงส่วนตัว (My Library) 3. การเพิ่มรายการอ้างอิง 3.1 การเพิ่มรายการอ้างอิงด้วยตนเอง (Adding References Manually) 3.2 การถ่ายโอนรายการอ้างอิงจากฐานข้อมูลการสืบค้นเข้าสู่ RefWorks 3.2.1 Importing data directly from online database 3.2.2 Importing data from saved text files 3.2.3 Importing records from other bibliographic management programs 3.2.4 Online Catalog or Database 4. นำรายการอ้างอิงที่จัดเก็บมาใช้งานร่วมกับโปรแกรมจัดการเอกสาร (Write-N-Cite)
 3. การเพิ่มรายการอ้างอิง 3.1 การเพิ่มรายการอ้างอิงด้วยตนเอง (Adding References Manually) 3.2 การถ่ายโอนรายการอ้างอิงจากฐานข้อมูลการสืบค้นเข้าสู่ RefWorks Importing data directly from online database Importing data from saved text files Importing records from other bibliographic management programs Online Catalog or Database 4. นำรายการอ้างอิงที่จัดเก็บมาใช้งานร่วมกับโปรแกรมจัดการเอกสาร (Write-N-Cite) 1. สร้างบัญชีชื่อการใช้งาน RefWorks 2. สร้างคลังข้อมูลอ้างอิงส่วนตัว (My Library) 3. การเพิ่มรายการอ้างอิง 3.1 การเพิ่มรายการอ้างอิงด้วยตนเอง (Adding References Manually) 3.2 การถ่ายโอนรายการอ้างอิงจากฐานข้อมูลการสืบค้นเข้าสู่ RefWorks Importing data directly from online database Importing data from saved text files Importing records from other bibliographic management programs Online Catalog or Database 4. นำรายการอ้างอิงที่จัดเก็บมาใช้งานร่วมกับโปรแกรมจัดการเอกสาร (Write-N-Cite).")
4
คลิกที่ Sign up for an Individual Account เพื่อลงทะเบียนการใช้งาน Register

5
พิมพ์ข้อมูลสำหรับการลงทะเบียนและคลิก Register Register

6
คลิกที่ Folders แล้วเลือก Create New Folder 1 2 Create New Folder

7
ระบุชื่อ Folder ที่ต้องการ จากนั้นคลิก OK Create New Folder 3

8
Adding references manually

9
คลิกที่ References จากนั้นเลือก Add New Reference 1 2 Adding references manually

10
เลือกรูปแบบของรายการบรรณานุกรม (Output Style) และประเภทสิ่งพิมพ์ (Reference Type) 4 Adding references manually 3
 และประเภทสิ่งพิมพ์ (Reference Type) 4 Adding references manually 3")
11
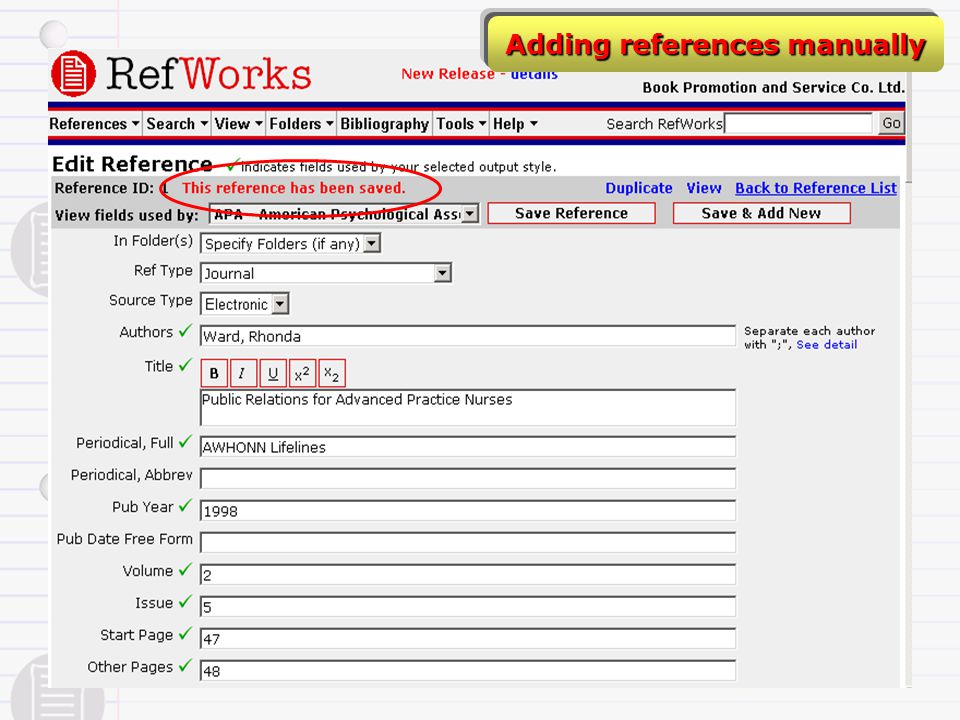
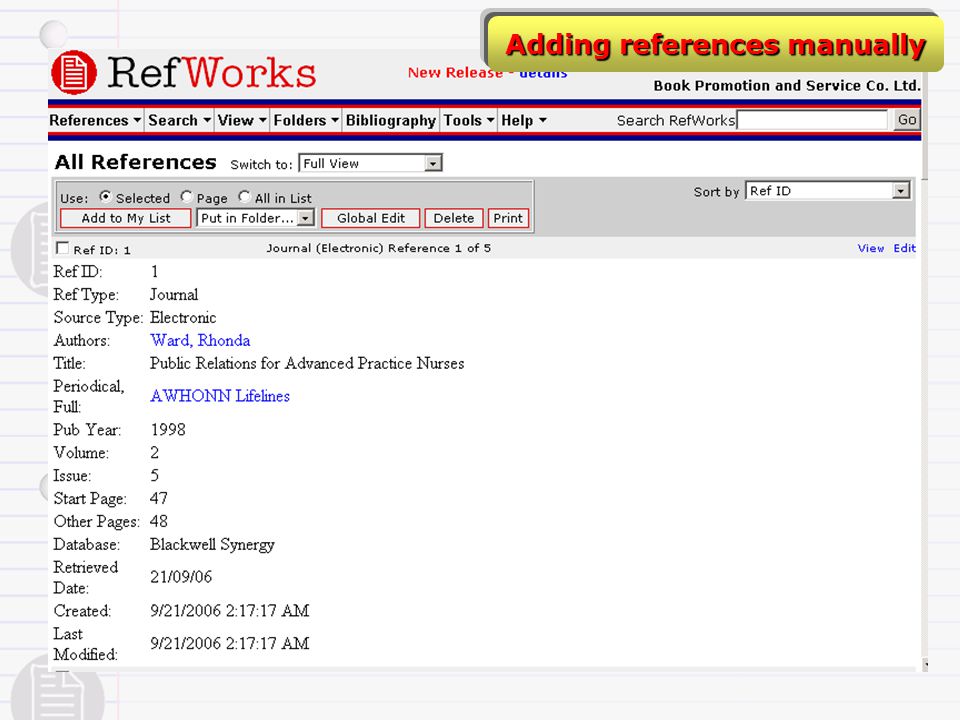
พิมพ์ข้อมูลทางบรรณานุกรม จากนั้นคลิก Save Reference เพื่อบันทึก 5 6 Adding references manually

14
Importing data directly from online database

15
Importing data directly from online database 1 2 คลิกเลือกรายการที่ต้องการ จากนั้นคลิกที่ My Research

16
Importing data directly from online database 3 คลิกเลือก Export Citations

17
Importing data directly from online database 4 คลิกเลือก Export directly to RefWorks

18
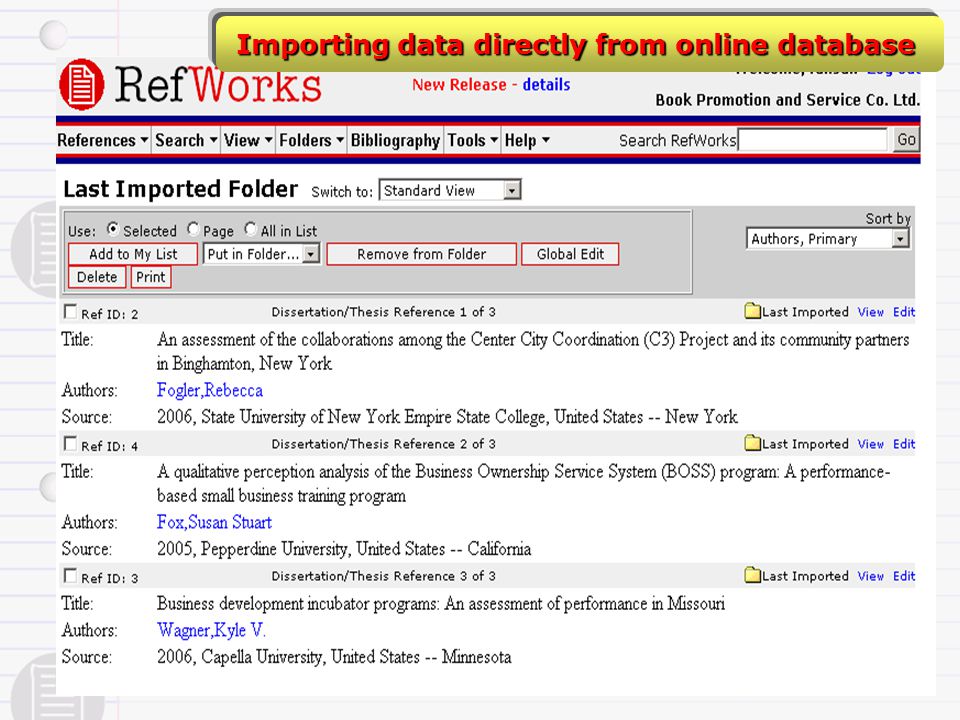
คลิก View Last Imported Folder เพื่อดูข้อมูล 5 Importing data directly from online database

20
Importing data from saved text files

21
คลิกเลือกเรื่องที่ต้องการ Importing data from saved text files 1

22
ในส่วนของ Results Manager ให้เลือก Fields เป็น Complete Reference เลือก Result Format เป็น Ovid แล้วจากนั้นคลิกที่ SAVE 2

23
Importing data from saved text files 3 คลิกที่ Continue

24
Importing data from saved text files คลิกที่ Save เพื่อบันทึกข้อมูล 4

25
Importing data from saved text files เลือกที่จัดเก็บข้อมูล ระบุชื่อ แล้วคลิก Save 5

26
Importing data from saved text files คลิกที่ References จากนั้นเลือก Import 6 7

27
คลิกเลือก Import Filter/Data Source 8 Importing data from saved text files

28
9 10 คลิกเลือกไฟล์ที่ต้องการจาก Browse จากนั้น คลิก Import

29
Importing data from saved text files คลิก View Last Imported Folder เพื่อดูข้อมูล 11

30
Importing records from other bibliographic management programs bibliographic management programs from EndNote 7 or lower and EndNote X

31
Importing records from other bibliographic management programs bibliographic management programs ใน EndNote ให้เลือกรูปแบบ Output Styles เป็น RefMan (RIS) Export จากนั้นเลือกรายการที่ต้องการถ่ายโอน 2 1
 Export จากนั้นเลือกรายการที่ต้องการถ่ายโอน 2 1")
32
3 คลิกที่ File จากนั้นเลือก Export Importing records from other bibliographic management programs bibliographic management programs

33
Importing records from other bibliographic management programs bibliographic management programs บันทึกข้อมูลในรูปแบบของ Text File 4

34
คลิกที่ References จากนั้นเลือก Import 5 6 Importing records from other bibliographic management programs bibliographic management programs

35
Importing records from other bibliographic management programs bibliographic management programs เลือก Import Filter ที่ต้องการ เช่น Desktop Biblio. Mgt. Software แล้วคลิกเลือกไฟล์ที่ต้องการจาก Browse จากนั้นคลิก Import 7 8 9

36
Importing records from other bibliographic management programs bibliographic management programs from EndNote 8 or 9

37
คลิกที่ References จากนั้นเลือก Import EndNote V8 or V9 Database 1 2 Importing records from other bibliographic management programs bibliographic management programs

38
Importing records from other bibliographic management programs bibliographic management programs คลิกที่ Browse เพื่อเลือก EndNote Database ที่ต้องการ 3

39
Importing records from other bibliographic management programs bibliographic management programs 4 คลิก Import เพื่อถ่ายโอนข้อมูล

40
Online Catalog or Database

41
คลิกที่ Search แล้วเลือก Online Catalog or Database 1 2 Online Catalog or Database

42
เลือกฐานข้อมูลที่ต้องการสืบค้น จากนั้นพิมพ์คำค้นแล้วคลิก Search 4 3

43
Online Catalog or Database 5 เลือกรายการที่สนใจ แล้วเลือก Folder ที่จะจัดเก็บ จากนั้นคลิก Import 67

44
Online Catalog or Database คลิก OK เพื่อยืนยันรายการที่ต้องการ 8

45
Write-N-CiteWrite-N-Cite

46
Write-N-Cite 1 2 คลิกที่ Tools แล้วเลือก Write-N-Cite

47
Write-N-Cite 3 คลิกเพื่อดาวน์โหลดโปรแกรม

48
Write-N-Cite คลิก Cite ในรายการที่ต้องการจะนำไปอ้างอิง 4

49
Write-N-Cite

50
Write-N-Cite – Create Bibliography คลิกที่ Bibliography แล้วเลือกรูปแบบบรรณานุกรมที่ต้องการ จากนั้นคลิก Create Bibliography 1 2

51
Write-N-Cite – Create Bibliography

งานนำเสนอที่คล้ายกัน
 ปรับปรุงครั้งล่าสุด.>")


 แผนกฝึกอบรม.>")


 ปรับปรุงครั้งล่าสุด 06/01/54 การใช้งานฐานข้อมูล ABI/INFORM Complete โดย...จิรวัฒน์ พรหมพร>")


 ปรับปรุงครั้งล่าสุด 08/04/54 การใช้งานฐานข้อมูล ACM Digital Library โดย จิรวัฒน์ พรหมพร>")


>")